Tuesday, November 9, 2010

Holiday Gifts

The holidays are here!!!! Well, almost....I have been looking forward to them since Fall began. I can't wait to start listening to Christmas music while the scents of the season float through the house. My oil burner runs 24/7 and I have some yummy Christmas smells to add to it.
What is your favorite scent of the season?

This month is the time we start thinking about gifts for family, teachers, co-workers, mail carriers, neighbors etc. So I put together this little candle in a jar. What a quick, easy and inexpensive gift to give. I will probably give these to the personnel at the school this year.
Candles are usually well loved and fun to receive. I know I enjoy getting them as gifts!!


Supplies
paper: joyful peace (gcd studios)
cardstock sticker: october afternoon
bling: zva creative
ink: black stazon
clear window sheet: creative cuts
ribbon: wal-mart ?
button: stash
tag punch: stampin up
stamp: wal-mart
twine: statsh
votive jar: dollar tree
candle: dollar tree

Read more...

Friday, October 15, 2010

October Plaque

Hi y'all! Lori Here......Since I have never used flocking before. For my technique I decided to flock a gcd Studios chip board piece. The piece I used is bird that was easily turned into a raven.
Flocking is a very simple ans easy technique. I will definitely be doing it again.


I started out with this Christmas frame.
I used stazon and a black sharpie to color the wood frame.
My black paint was out on loan. I love the shine the stazon
created. I used my heat gun to speed up the drying process.

Here is the chipboard piece after I put a layer of black stazon
over it. Inking it before adding the flocking helps hide any
missed spots. To adhere the flocking I used Elmers spray
on glue. It seemed to work well and gave an even coat.

Here is a close up of the flocking. It actually feels like
velvet too. It gives the bird a nice texture.
Have a super day!

Read more...

Thursday, October 7, 2010

Candy Corn and Peanuts

This month for Gcd Studios we were challenged to decorate one of their chip board tags in a Fall theme. I decided to tie the tag I made to a mason jar filled with candy corn and peanuts. YUM! They are the perfect snack. I'm planning on giving each of the children's teachers one too.

I used papers from the Independence and Sunny days collection.


The orange chip board piece is from gcd studios. I used the
Chip Art tool to deboss the word FALL.


I hope you all are enjoying Fall. It is such a beautiful time of year!
Lori R.

Read more...

Friday, September 17, 2010

Wow! It's hard to believe Fall is almost here. The kids have been back in school for several weeks, the air is turning cool and the urge to bake pumpkin-y treats is undeniable. Fall is my favorite season!! What's yours?

"Make a Word " using magnet letters is very educational. I came up with this fun idea for my 5 yr. old daughter using the star, Chip Art shapes and the peacock, ornamental letter stamps. She loves learning and I'm always looking for fun, innovative ways to keep her interested.


Note to self: Make the letter "O".
Start out with stars in various sizes.

Deboss the letters into the stars.


Paint the shapes with acrylic paint.


Once dry. Color the letters in with a fine tip, Sharpie.
Glue a small magnet to the back of each star.
Now they are ready to play "make a word".

Read more...

Thursday, September 9, 2010

Hi! Lori here. This month we were challenged at gcd Studios to create some type or jewelry. We could make pins, necklaces, bracelets, hair accessories etc. I chose to make hair accessories. As a mom of three girls. I know you can never seem to have enough of them.

Today I have a cute little tin to share with you. I had the tin in my stash but you may be able to purchase something similar from Papertrey Ink or Stampin' UP. Your local craft store may even carry them.
This would make a perfect gift for a little girl's birthday or special occasion.

All the supplies are from the Homespun Chic collection minus the rub-on and twill ribbon.


To make these I simply took these pre-made, Homespun Chic felt embellishments (scroll down, photo is on the bottom right) and hot glued hair clips to the back of them. There are six in each pack so you get a lot of variety.

Read more...

Friday, August 27, 2010

Gcd Studios make these cute little necklaces to coordinate with the Chip Art tool. I created a crackle finish on mine. I added some bling and distressed the edges with some paint. They are fun and easy to create. They would be perfect birthday party projects.


Please Hop over here to see Heidi Sonbouls cute necklace.

Read more...

Thursday, August 19, 2010

Embellish Challenge

I've been wanting to participate in an Embellish challenge for a long time. So, I was happy to sit down and create this card for the current challenge. The colors are so soft and lovely. They went along perfectly with the October Afternoon Thrift Shop cardstock stickers I recently purchased.

Sorry for the lack of chat but I must run....have a super special day!


supplies
cardstock: very vanilla, kraft
floral cardstock sticker: october afternoon (thriftstore collection)
scalloped border cardstock sticker: october afternoon (thriftstore collection)
cardstock sticker tag: october afternoon (thriftstore collection)
friend rub-on- melissa frances
ribbon: stash
pearls: zva creative
background stamp: stampin up (french script)
cuttlebug folder: swiss dots

Read more...

Tuesday, August 17, 2010

Pinwheels and circle punches. gcd Studios

To be completely honest. Pinwheels were always a challenge for me. I would look at them and feel quite confused at the way the blades laid. For some reason my brain just couldn't "go there".
I saw some of these browsing the net this week and I knew I wanted to figure out how to make them. They turned out to be very quick and easy to create. They can be created in less than 5 minutes. I think I'm going to making a lot of these in the near future!


********************************************************************************
Pinwheel Tutorial:

Punch 4 circle of the same size.

Cut each circle in half. You will have 8 halves.


Punch a smaller circle and cove with adhesive.
Lay 4 halves evenly on circle.

Take the remaining circles and layer them over the
bottom halves. (all halves go the same direction)


Have a super day! ~lori

Read more...

Monday, August 9, 2010

My Town...GCD STUDIOS


Now you all know I'm a little rusty in the SB area. I gave it up for cards and altered projects. That means a challenge like this really stretches my comfort zone. Which is a good thing!! Anywho......This month we were challenged to create a l/o using photos of our town. This is what I came up with using the Independence collection. I kept my l/o very simple so the photos would be the main focus.


Our town is the first capital of Ohio. We celebrated 200 years in 2003. Chillicothe holds a lot of Ohio history. With farming still being a fairly big industry.
Downtown host several quaint shops. We enjoy strolling through them occasionally. My mom celebrated her birthday last week and in honor of her day I took her shopping downtown and bought her brunch at one of the little cafes. Fun times! :)


Photos left to right: united methodist church (walnut street), yoctangee park (water street), united methodist church (walnut street), in honor of fallen soldiers statue (water street), Lloyd's Sweet Shoppe (water street), The Pump House (Yoctangee park)
TSM for stopping by!
~lori

Read more...

Thursday, August 5, 2010

ChipArt tool give away

PLEASE go here to see how you can be eligible to win the new ChipArt Tool from GCD studios.

Read more...

Friday, July 9, 2010

Hi, it's Lori here with you today. I hope your week is going along smoothly! We've been enjoying the lazy summer days. How about you?

This month's theme was parties. The photos Heidi S. put together are amazing! I was not at a loss for inspiration.


I love girly styles and colors so it's no surprise that the top right photo stood out to me. The colors of the cupcakes, party hats, and banner in the photo work perfectly with the Homespun chic collection. The shades of pinks and greens are perfectly scrumptious.
I always need birthday cards so this card and gift bag combo will come in handy.

Here's a close up of some of the detail. Scallops, fabric, lace, and pearls are the perfect vintage touches.


The bag only cost around .33 cents at Hobby Lobby. So this gift bag is a very inexpensive gift wrap. I started out making a tag but in the end I decided to add it to the front of the bag instead of hanging it from a handle.


I used Homespun Chic paper and borders to create the card and decorate the bag. I REALLY love that collection! It is one of my absolute faves!!!!!

Have a SUPER day!!
~lori

Read more...

Thursday, June 17, 2010


I'm excited to bring you my technique today. I guess you could say I was inspired by the bright and shiny necklace in the photo. And of course, I can't leave out the vibrant blue skies.

A light bulb came on when I was digging out possibilities for this month's challenge. I believe I was working on another project and had these two pieces of chipboard laying out on the table. For some reason they caught my eye and all I could see using them for was a robot. I could just envision his cute little boxy face. Almost immediately I went to work spray painting the little dude.
After mulling the idea around for a bit. I started thinking of supplies I already had on hand that I could use. Like pop cans. I washed a couple out before bed that night so they could be drying. Then the idea to use hardware came into play. So I dug around and found some in a kitchen drawer. All I had to do was dab some acrylic paint on them with tiny piece of a sponge.
Without further ado....Meet Ramsey the robot. I think he's such a cutie! He was so much fun to create. Hmmmm, maybe he needs a Mrs.?


Supplies: 2 pieces of medium plaques chip art chipboard (#551), blue redwork homespun chic paper, red and white card stock, 2 pop cans, silver metallic spray paint, 7 silver nuts (hardware), silver wire, 1/2 in. circle punch, rhinestone, stickers, blue acrylic paint, pen, hot glue gun, kid paintbrush, foam tape


Spray paint chipboard. Allow to dry (approx.15 min)

Cut two 1 in. strips from one can for legs. Accordion fold and adhere.
Cut two 3/4 in. strips from 2nd can for arms. Accordion fold and adhere.
Create two rectangles from a piece of scrap aluminum.
One will be cut for the eyes. The other will remain uncut for the neck.
Cut one rectangle in half. Fold to create eyes. Make a small square
out of scrap aluminum. Fold to create a triangle for nose.
Also cut small rectangle for mouth.

Wrap wire around end of paint brush to create antennae.

Complete instructions:

  1. spray paint chipboard. allow to dry approx. 15 min. cut pop cans to create arms and legs
  2. accordion fold arms and legs. adhere.
  3. cut neck from scrap. adhere to head and body to connect. create eyes, nose and mouth. adhere.
  4. paint nuts. allow to dry approx. 15 min. once dry adhere.
  5. trace and cut middle panel. hand draw hearts, hands and feet. cut and adhere.
  6. affix stickers to card stock. cut and adhere.
  7. wrap wire around paintbrush. remove. punch out circle affix rhinestone. adhere to wire. adhere wire to robot.
  8. cut card stock to create card base. cut patterned paper slightly smaller than card stock and adhere. Adhere robot to card base using foam tape.

~lori

Read more...

Wednesday, June 9, 2010

Is it really June already?? School is out (JOY, JOY) and it's the month we celebrate the fathers in our lives. Both events are special in my book. I enjoy my kidlettes being out of school. We usually have a long to-do list each summer. So far on our list. We have vacation (to a never been before state), summer reading program at library, baseball, camping, voice lessons, volley ball camp, church camp, Florida trip, garden (it's actually growing famously). Sounds like a summer of fun!

Father's Day becomes more special each year as our children get older. I enjoy watching my hubby interact with kids in such a wonderful way. Our children have been blessed with a father who is active in their lives. He goes on field trips, attends field day, cooks for the school cook out, helps with baseball practice and games, he's a good provider, attends church each service, makes sure they get the proper discipline, I could go on and on. He really helps make my job as a mom a joyful experience.

The inspiration this month evokes such carefree feelings. I was really pulled in by the hot air balloons. By the way they float so haphazardly through the cloudless, deep blue sky with such ease and beauty. I can hardly tear my eyes away from the bold colors and patterns. It's almost breath taking.


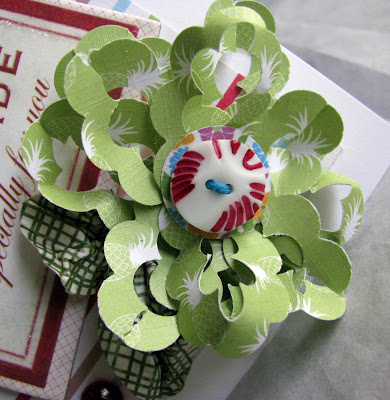
Needless to say, my first card was inspired by the hot air balloons bold color and pattern. I pulled some paper from the Smoothie Shoppe and Lydia collections. I added a Melody Ross chipboard tag, some bling, a doily, and a Melody Ross button. The flower was created with a scalloped punch. I have a small tutorial for it in the works.

Below is a close-up of the flower. The paper used for the flower is called Pinas (smoothie shoppe and the stems are called Linen (lydia collection) .
This card has many elements seen in the photos. The scallops (cloud necklace), green colors ( balloon), stripes (balloon), blues (sky), orange, bronze accents (dirt road and fields). How fun is that. Talk about inspiration. It's amazing what you can get out of a few photos.
Patterned paper used for this card. Smoothie Shoppe and Homespun Chic.

Since this is the month we celebrate our fathers. And masculine cards seem to be a bit of challenge for me. I decided to create something really simple but fun. I started out with a plain Kraft card base. I wanted to make a frame using score lines. To do that. Punch a square and use it to mark each corner. Then simply connect the lines. I then stamped a smaller panel with a wood grain BG stamp. Adhered it to the center of the frame with pop dots. To create the tie, I used a square punch and a straight edge. The "knot" is a square cut in half with each angle tucked under. I then faux stitched around the edges.
Patterned paper is Diamonds from the Lydia collection.

TSM for bearing with me this long. I guess I got a little carried away with this month's challenge. I just couldn't seem to stop myself!
My last project is for my sweet daddy. He likes to fly little airplanes and he thinks Snoopy is funny. It also matches his office. Which in turn will make my momma happy.
The paper is form the Artsy Urban collection. I also used Melody Ross Chip Art Tool and chipboard. I colored in the stars and DAD with Copics.

I hope your summer has gotten off to a great start! C-ya next month. BOOM Time! :)

~lori

Read more...
Disclosure Policy

This blog is a personal blog written and edited by me. This blog does not accept any form of cash advertising, sponsorship, or paid topic insertions. However, we will and do accept and keep free products, services, travel, event tickets, and other forms of compensation from companies and organizations.
This blog abides by word of mouth marketing standards. We believe in honesty of relationship, opinion and identity. The compensation received may influence the advertising content, topics or posts made in this blog. That content, advertising space or post will be clearly identified as paid or sponsored content.
The owner(s) of this blog is not compensated to provide opinion on products, services, websites and various other topics. The views and opinions expressed on this blog are purely the blog owners. If we claim or appear to be experts on a certain topic or product or service area, we will only endorse products or services that we believe, based on our expertise, are worthy of such endorsement. Any product claim, statistic, quote or other representation about a product or service should be verified with the manufacturer or provider.
This blog does contain content which might present a conflict of interest. This content may not always be identified.
To get your own policy, go to http://www.disclosurepolicy.org

  © Blogger templates ProBlogger Template by Ourblogtemplates.com 2008

Back to TOP